# Assessment Portal Guide

{% stepper %}
{% step %}

### Get Started

Set up your account and create your reporting entity to begin the assessment process.

<details>

<summary><strong>Register and Log In</strong></summary>

<p align="center"><a href="https://portal.gresb.com/user/sign_up" class="button primary" data-icon="arrow-pointer">Register here</a><a href="https://portal.gresb.com/user/sign_in" class="button secondary" data-icon="arrow-pointer">Log in</a></p>

#### Registration

If you don’t have a GRESB account already, you can sign up to create one using the button above.

Once your account has been created and activated, you can log in to the GRESB Portal to access your reporting entities and assessments.

<figure><img src="/files/0YfkOhZK87vA3m9rRuvo" alt="" width="563"><figcaption></figcaption></figure>

</details>

<details>

<summary><strong>Create a New Reporting Entity</strong></summary>

Anyone with a user account can set up a reporting entity in the GRESB Portal. A reporting entity is any entity - portfolio, fund – that will complete a GRESB Assessment.

#### Step 1: Access the Assessment Portal

Log in to the GRESB Portal and navigate to the Assessment Portal, as shown in the screenshot below.

#### Step 2: Create a New Reporting Entity

Once logged in, click the “Create new reporting entity” button to begin setting up a Data Center entity.

<figure><img src="/files/uTlzjlAfxrCTO4Z0g5Td" alt="" width="563"><figcaption></figcaption></figure>

#### Step 3: Enter Entity Information

You will be asked to provide basic information about the entity. Complete the required fields to proceed.

<figure><img src="/files/3DmCVTiBnhpUihEJunvp" alt="" width="563"><figcaption></figcaption></figure>

#### Step 4: Manage Entity Details

If you need to update the entity’s characteristics at a later stage, navigate to the entity’s Assessment Overview page and select “Manage entity” from the menu on the right.

<figure><img src="/files/tdG8F62SUzCI1ERdipLz" alt="" width="563"><figcaption></figcaption></figure>

&#x20;

</details>

<details>

<summary><strong>Manage Users</strong></summary>

You can add as many users as you need in the GRESB Portal.

When you log in, you will land on the Assessment Portal overview, from there, you should follow the steps below:

#### Step 1: Select the Entity

Click on the entity for which you would like to manage users. This will open the entity overview page.

#### Step 2: Access User Permissions

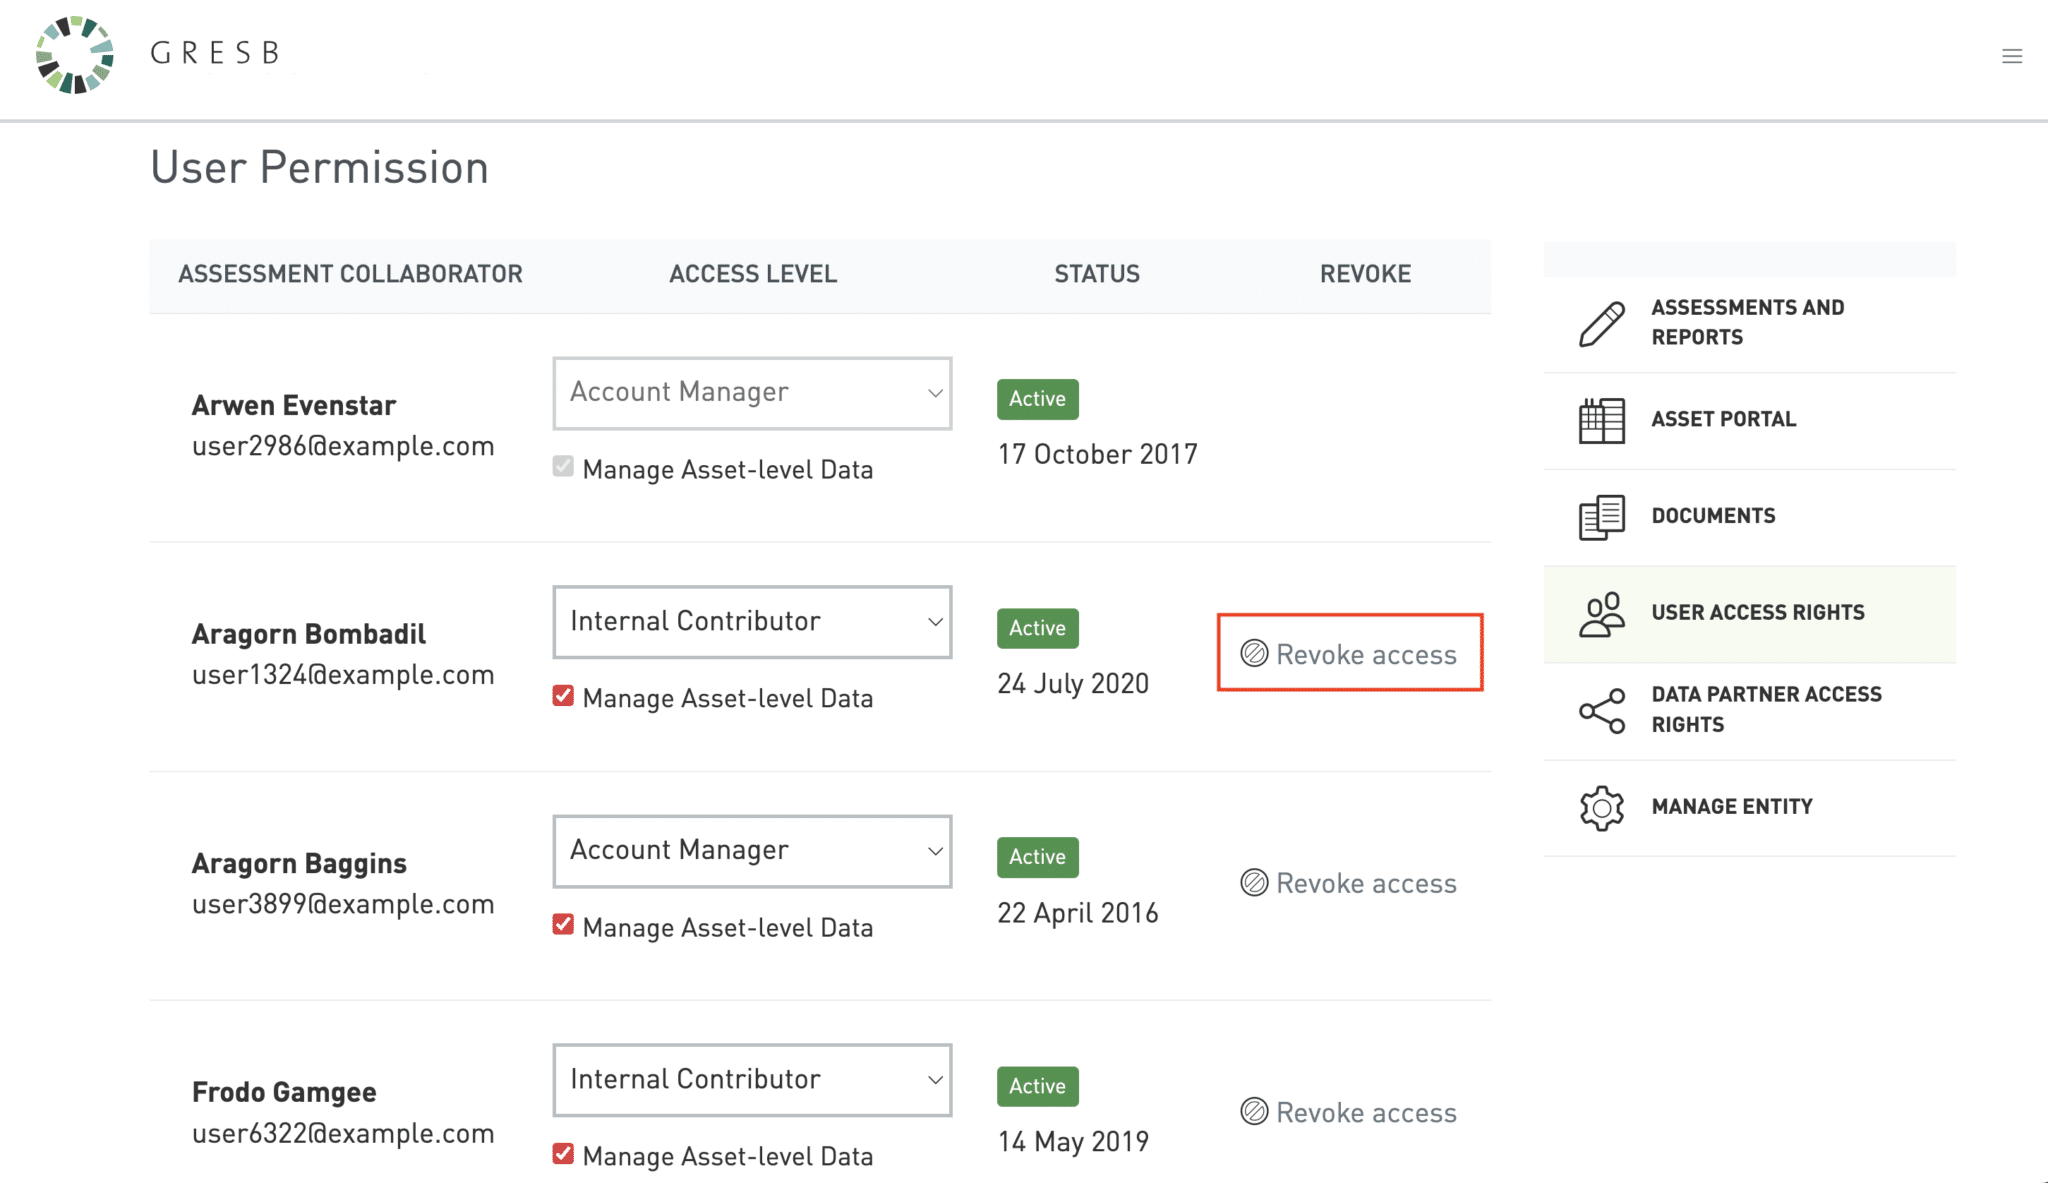
Click on “User Access Rights” in the menu on the right side to view the users with access to the entity. The screenshot outlines this in red.

If you are the **Account Manager** for the entity, you can:

* Change access levels for existing users
* Invite new users
* Remove users

<figure><img src="/files/i0RTgAs7ipvPwPap7uUp" alt="" width="563"><figcaption></figcaption></figure>

#### **Adding Users**

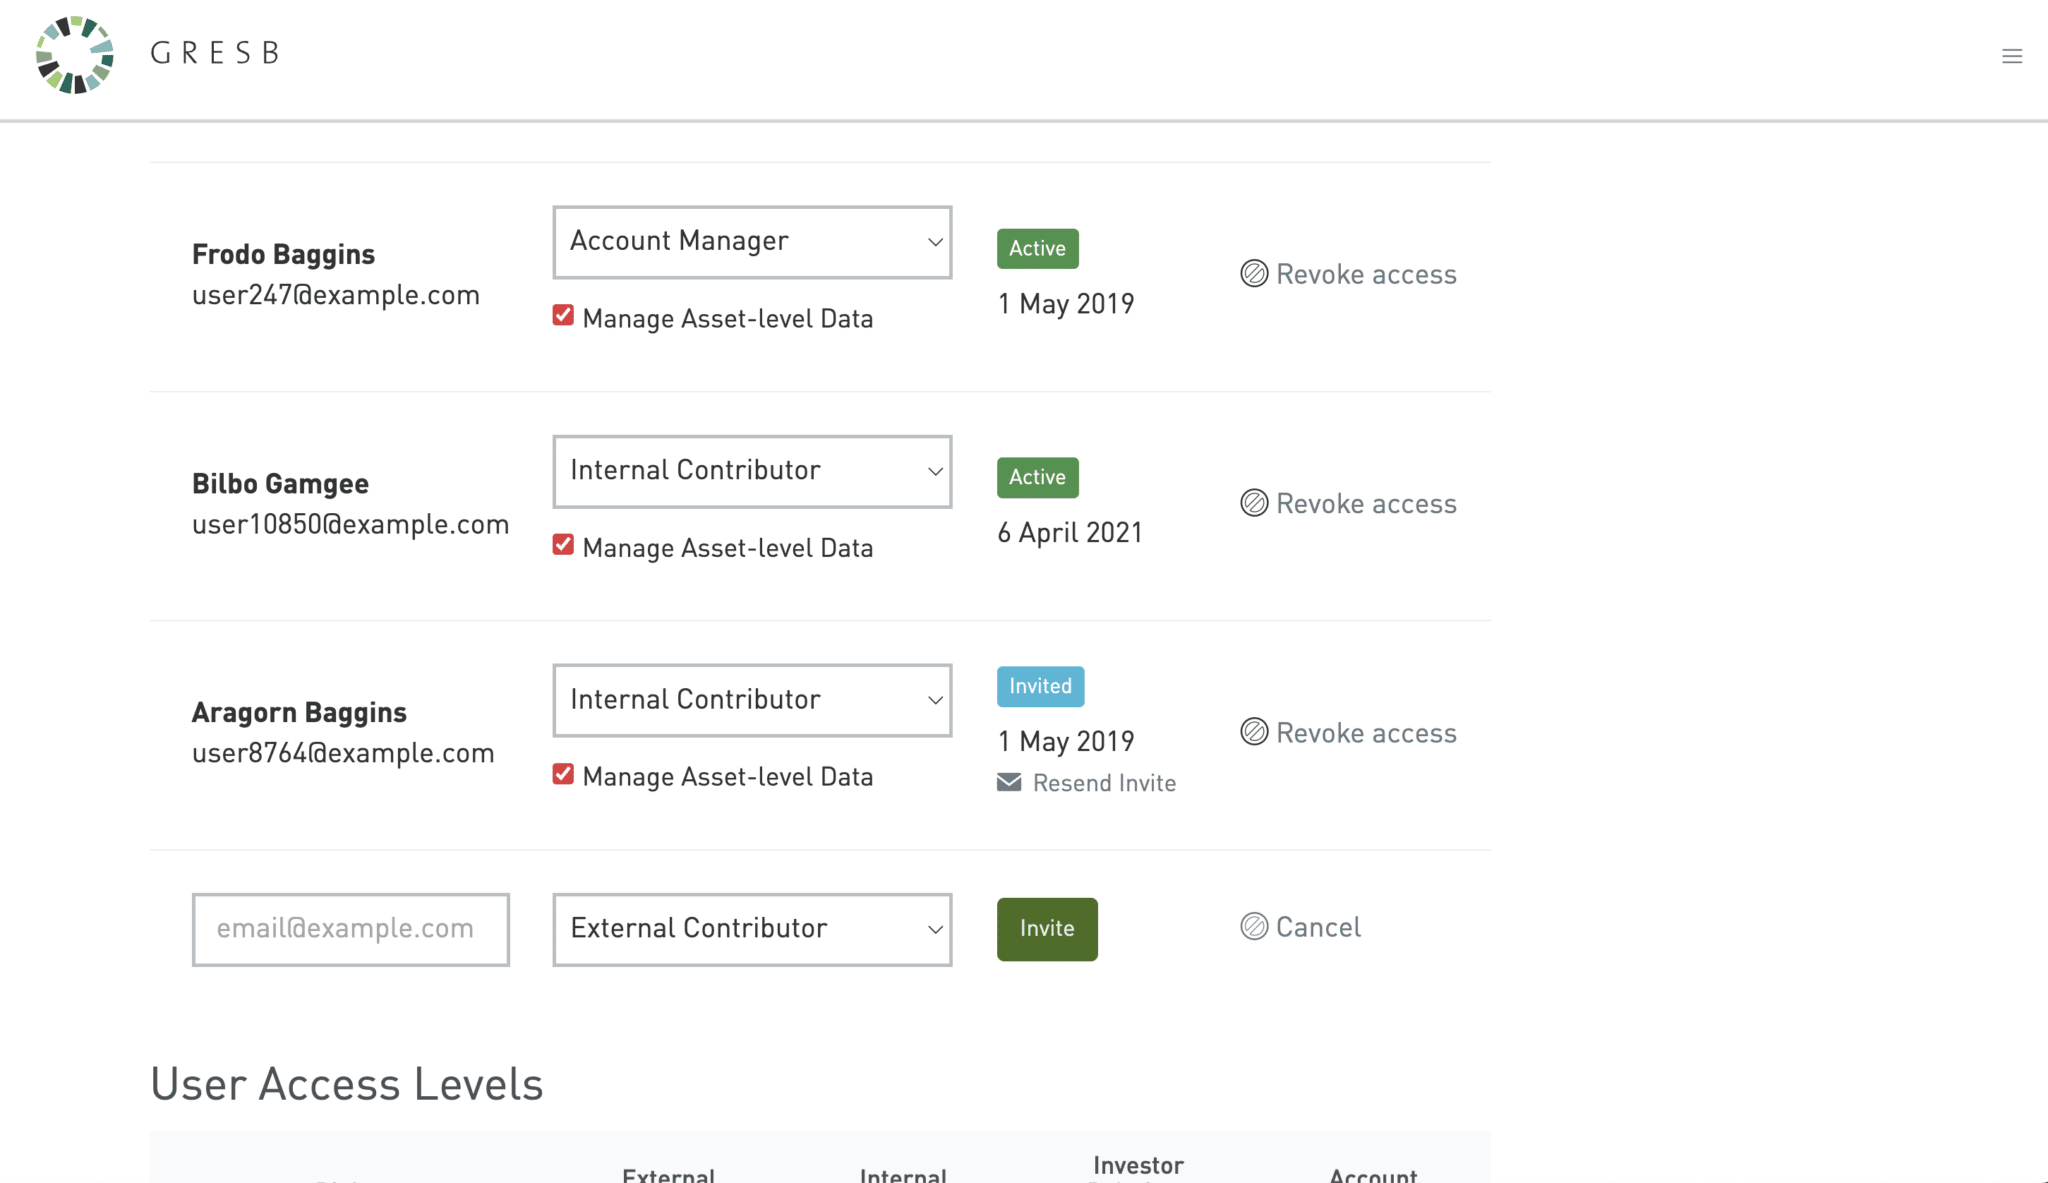
Within the user list, enter the email address of the person you wish to add, assign the appropriate access level, and click the “Invite” button to add a new user.

If the user does not yet have a GRESB Portal account, they must first create and activate one. Once their account is active, they will be able to access the entity.

<figure><img src="https://files.synap.ac/production/EMnT7h7kXj/xkO5G-Dn9pBtK2z1mRSzc_RE-3.3-5.png" alt=""><figcaption></figcaption></figure>

#### **Removing Users**

A user can be removed from a particular entity by clicking "Revoke access," highlighted in the screenshot below.&#x20;

<figure><img src="https://files.synap.ac/production/EMnT7h7kXj/crX03JReAvJtqM3U7-gl0_RE-3.3-6.png" alt=""><figcaption></figcaption></figure>

#### **Changing Access Levels**

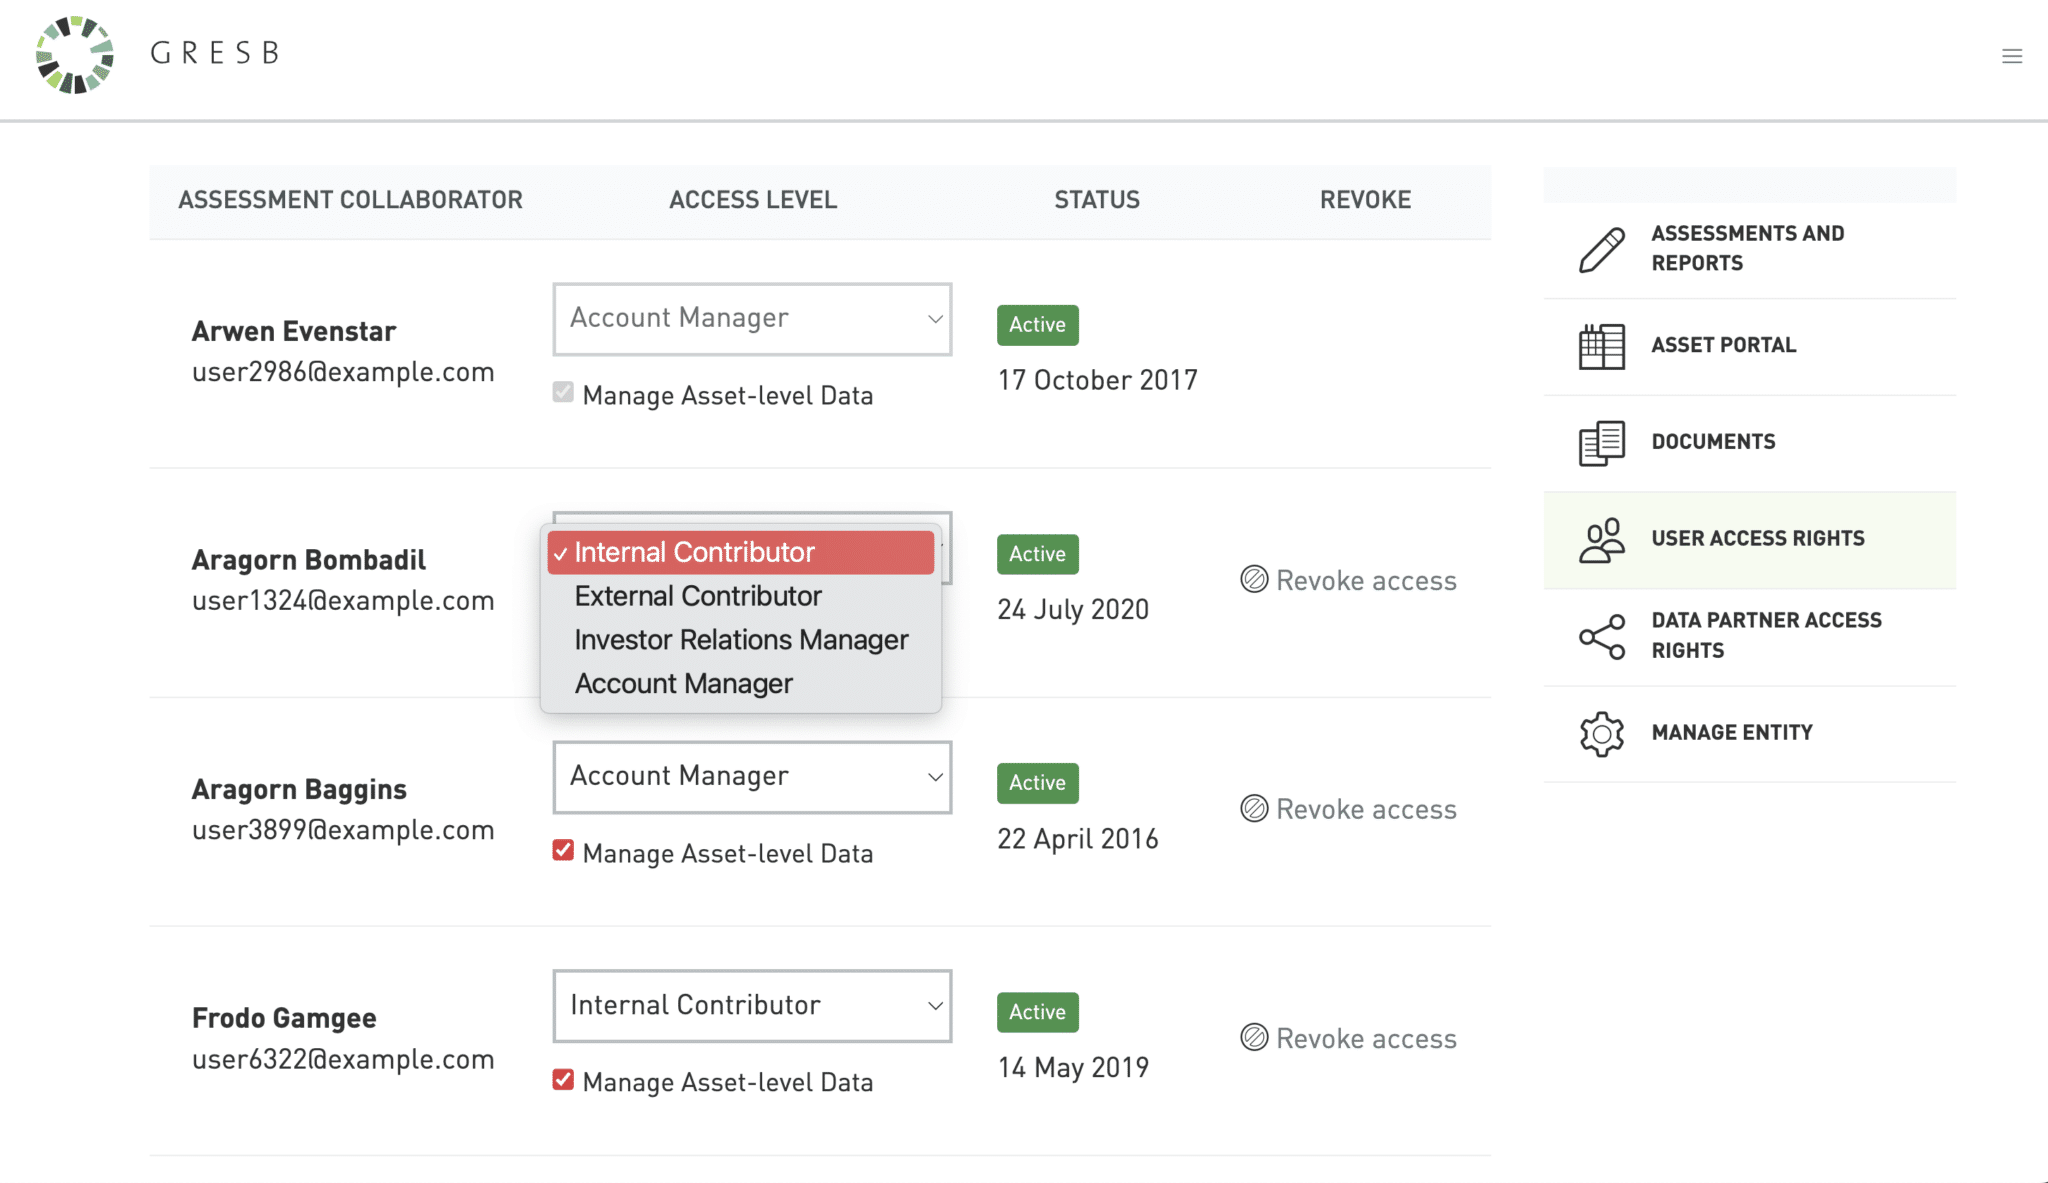
A user’s access level can be adjusted using the dropdown menu, as shown in the screenshot below. For a detailed explanation of each access level, please refer to the “User Access Rights” section below.

You can also specify whether a user is permitted to amend asset-level data by selecting the relevant option, as illustrated in the second screenshot below.

<figure><img src="https://files.synap.ac/production/EMnT7h7kXj/jFvLeGVqt9NRXbTVzfRYK_RE-3.3-7.png" alt=""><figcaption></figcaption></figure>

### **User Access Rights**

<figure><img src="/files/fCtyxFHmgRdoCEjAaq1D" alt=""><figcaption></figcaption></figure>

</details>

{% endstep %}

{% step %}

### Managing Assessments

Access and manage your assessment settings, users, and submission status throughout the reporting cycle.

<details>

<summary><strong>Assessment Summary Page</strong></summary>

Click on the name of the entity to view its assessment summary page.

<div align="center" data-full-width="false"><figure><img src="/files/RXzhVdhIKgIcwd2TTTfz" alt=""><figcaption></figcaption></figure></div>

</details>

<details>

<summary><a href="#video-library"><strong>Intent to Subm</strong></a><a href="#video-library"><strong>it</strong></a>  <i class="fa-video">:video:</i></summary>

Once the entity has been created, you can begin an assessment by selecting the one you wish to complete.

You will first be asked to indicate your intent to submit the assessment to GRESB.

* Select “Yes” if you intend to submit.
* Select “Maybe” or “No” if your submission is not yet confirmed.

You may update this selection at a later stage if needed.

{% hint style="info" %}
Please note that any clarification provided in the accompanying text box will be shared with GRESB Investor Members.
{% endhint %}

<figure><img src="/files/LK6ijQJIV2oHkNyZmHnv" alt="" width="563"><figcaption></figcaption></figure>

</details>

<details>

<summary><strong>Data Sharing Settings</strong></summary>

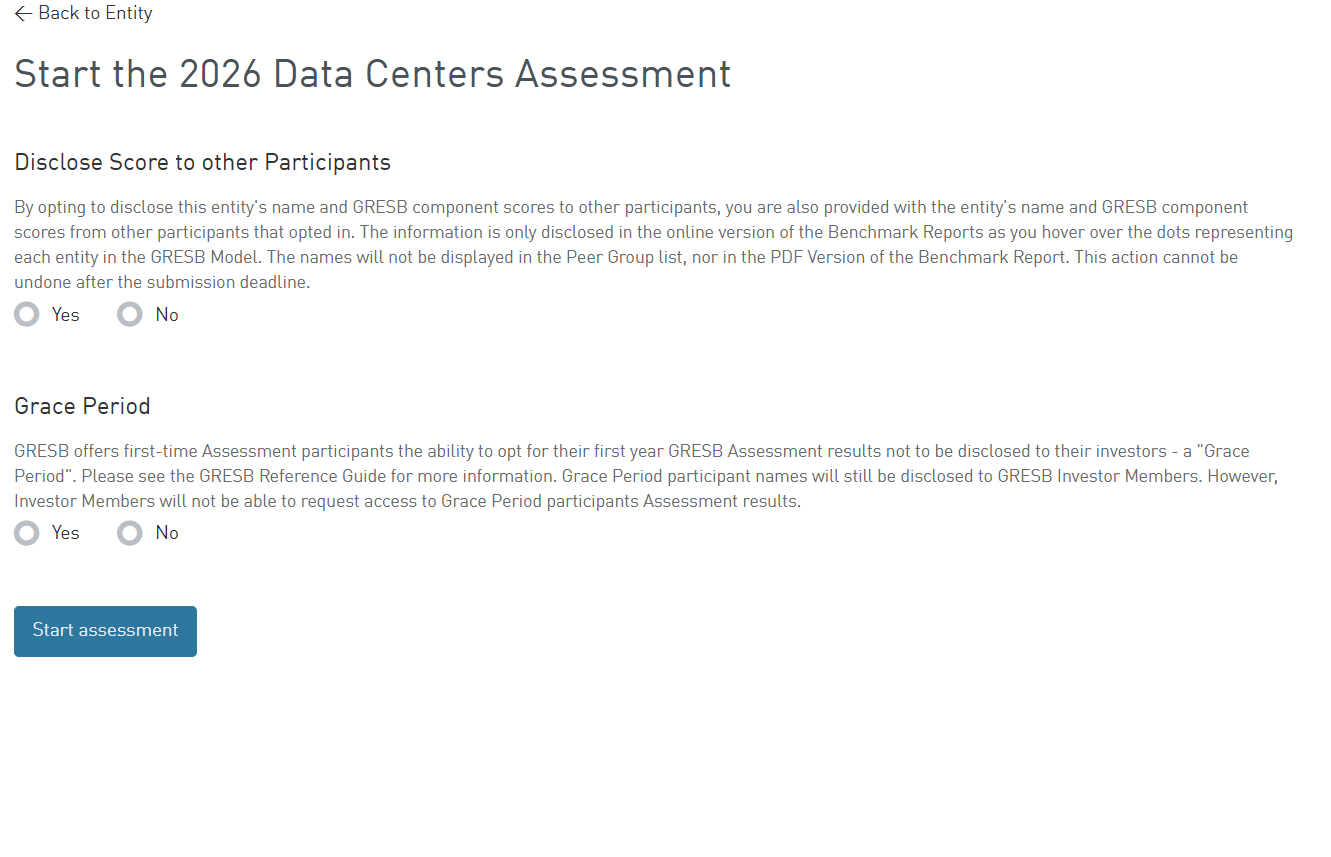
#### Disclose Score to Peers

When a participant completes the Assessment, they will be prompted to indicate whether they intend to disclose scores to peers. By selecting “Yes,” participants agree to disclose their entity’s name and Section Scores to peer group participants who have also opted in to sharing this information. Any peers who have not opted in will not be able to see this data.&#x20;

Peer group scores can be found in the GRESB Model when viewing the Benchmark Report in the GRESB Portal.&#x20;

&#x20;It is important to note that the decision to disclose to peers cannot be changed after the entity has submitted its assessment.&#x20;

#### Share Data with Investors

Data Center non-listed participants can opt to share data with GRESB Investor Members.

If a participant does not give consent in this section, individual asset data will not be disclosed to GRESB Investor Members but will be used only for aggregation purposes.&#x20;

<figure><img src="/files/MhP7V37NaiCe19BAikpL" alt="" width="563"><figcaption></figcaption></figure>

</details>

{% endstep %}

{% step %}

### Assessment Response

Complete, review, and submit your assessment responses within the GRESB portal.

<details>

<summary><strong>Start the Assessment</strong></summary>

Participants can begin their GRESB Assessment(s) on **July 15th.**

After providing the "Intent to Submit" and selecting data sharing settings, the entity will be able to select the section(s) they'd like to assess.&#x20;

It is possible to change the component selection at any time during the assessment period.&#x20;

{% hint style="info" %}
All selected sections will be included as part of the submission.&#x20;

**Not sure which Section(s) to select?**&#x20;

See the [Assessment Structure & Scope](/data-center-assessment/1.-getting-started/assessment-structure-and-scope.md) page for more details.
{% endhint %}

</details>

<details>

<summary><strong>Pre-filling</strong> <i class="fa-video">:video:</i> (Coming in 2027)</summary>

GRESB’s pre-filling functionality allows participants to carry forward selected responses from previous reporting years, helping reduce reporting time and streamline the assessment process.

Starting in 2027, the second year of reporting for Data Center participants, this functionality will be available for entities that participated in the Data Center Assessment in the previous year. Eligible indicators may be pre-filled using responses submitted in the prior reporting cycle.

Please note:

* Indicators that have been revised by GRESB will not be eligible for pre-filling.
* Participants remain responsible for ensuring that any pre-filled responses and supporting evidence are accurate and applicable to the reporting year selected in indicator RC1.

{% hint style="info" %}
The list of indicators eligible for pre-filling in 2027 will be published closer to the start of the next reporting cycle
{% endhint %}

</details>

<details>

<summary><strong>Editing the Response</strong> </summary>

Every indicator is identified by a short title (e.g., Board-Level oversight) and a code (e.g., LE1).&#x20;

All indicators include a primary question that can be answered with ‘Yes’ or ‘No.’

* When selecting ‘Yes’, participants are required to provide further information by selecting one or more options.&#x20;
* When selecting ‘No’ or 'Not Applicable,' participants may not select any additional sub‑options.&#x20;

Participants should select all options that accurately describe the organizational activities.&#x20;

**Response types for each indicator may use one or more of the following elements:**

<table><thead><tr><th width="184.79296875">Element</th><th>Description</th></tr></thead><tbody><tr><td><strong>'Yes' or 'No' radio buttons</strong></td><td>Some indicators have additional mutually exclusive radio buttons. In all cases participants must select the one that is the most applicable.</td></tr><tr><td><strong>Checkboxes</strong></td><td>Most indicators contain a set of checkboxes that participants can select after answering ‘Yes’ to the overall indicator question. Participants may select multiple sub‑options that apply to their entity or fund manager.</td></tr><tr><td><strong>'Other’ answers</strong></td><td>Some indicators offer the opportunity to provide an alternative selection (‘Other’). Such ‘Other’ answers must be distinctly different to the options listed in the question. All answers are validated as part of the data validation process.</td></tr><tr><td><strong>Percentages</strong></td><td>Some indicators require the input of additional data points, such as the percentage of quantitative data, the percentage of portfolio and sites covered, etc.</td></tr><tr><td><strong>Open text boxes</strong></td><td><p></p><p>GRESB distinguishes between two kinds of open text boxes:</p><p></p><ul><li>For reporting purposes only. These are displayed in the Reports but are not validated or scored.</li><li>Additional context for the answer provided. These are below the ‘Yes/No’ response and enable the participant to provide general comments that will appear on the Insights and Benchmark Reports, but are not validated or scored.</li></ul></td></tr><tr><td><strong>Evidence upload</strong></td><td>Some indicators require participants to upload additional documentation to support their selections. A list of manually validated indicators can also be found in the <a href="/pages/6uFqP7u9ZRFTx4lFSGQ3">Indicator Summary</a> of the GRESB Guides.</td></tr></tbody></table>

</details>

<details>

<summary><strong>Review &#x26; Submit</strong></summary>

The <i class="fa-house">:house:</i> **Overview** tab is always available to participants when completing the assessment.

1. Before proceeding, ensure the response is **complete**. The Contents overview flags missing information. ​
2. Before an entity can submit its assessment, it needs to be linked to a participant member account. If you are uncertain whether the entity is linked, contact the GRESB Helpdesk.

A confirmation email will be sent to the account manager users after submission.&#x20;

<figure><img src="/files/1mHwx6hvwS5dmosPHgwF" alt="" width="563"><figcaption></figcaption></figure>

</details>
{% endstep %}
{% endstepper %}

## Frequently Asked Questions

<details>

<summary>Where can I find my Fund ID?</summary>

The Fund ID is the first number that appears in the URL after "entities/" when you click on any of your entities in the GRESB Portal.

<figure><img src="/spaces/31ovOsfsdlwYDiJclXFF/files/en7MF6L6PbO6eFGAujh3" alt=""><figcaption></figcaption></figure>

Users can also export fund IDs from within the **Data Exporter** tool. Users can access the Data Exporter via the GRESB Portal under the menu “Data Exports.” Any downloads from the Data Exporter have Fund ID as the third column.

</details>

<details>

<summary>How can I edit my component selection once I've started the assessment?</summary>

Participants can add or remove a component (i.e., Operational, New Construction) to their assessment at any point up until their submission.

To do so, you must:&#x20;

1. Go to the Assessment Portal and select the relevant entity&#x20;
2. Click on “More” in the portal menu&#x20;
3. Navigate to “Component Selection”&#x20;
4. Check the box for the component you wish to add or remove.

This process allows participants to opt into certain assessment sections without needing to restart their assessment.&#x20;

</details>

## Video Library <i class="fa-video">:video:</i>

{% embed url="<https://files.gitbook.com/v0/b/gitbook-x-prod.appspot.com/o/spaces%2F31ovOsfsdlwYDiJclXFF%2Fuploads%2FbbmqEoWmVMhKwVfNuHaN%2Foriginal%20(1).mp4?alt=media&token=8e3cd3c9-2078-473e-99c8-93f5d6594784>" %}


---

# Agent Instructions: Querying This Documentation

If you need additional information that is not directly available in this page, you can query the documentation dynamically by asking a question.

Perform an HTTP GET request on the current page URL with the `ask` query parameter:

```
GET https://guides.gresb.com/data-center-assessment/1.-getting-started/assessment-portal-guide.md?ask=<question>
```

The question should be specific, self-contained, and written in natural language.
The response will contain a direct answer to the question and relevant excerpts and sources from the documentation.

Use this mechanism when the answer is not explicitly present in the current page, you need clarification or additional context, or you want to retrieve related documentation sections.